Monday, September 28, 2009

Morales, Joshua: Final Project


              For my final project I decided to do three types different of katanas. I used three spiritua; animals and seperated the blade into 8 separate parts: Blade, Sheath, Back, Middle, Tip, Sword Guard, Butt, and tip of sheath.I did a detailed amount of work on each blade applying textures made from scratch including, carbon fiber, brushed metal, and gold. Also I made the Sword guards from scratch each with a unique look to them.

Thursday, September 24, 2009

Project 4 Nico, Cervantes


My product illustration was credit/ debit cards. I wanted to create a debit card design that was not the conventional two tone color design. My target audience for this project was the rocker/ bmx/skater audience. I wanted to try and create something that would be enjoyed universally so I decided to go with a simple black white and grey color scheme. I'm very happy with the outcome and time I put into making this illustration.

Wednesday, September 23, 2009

Final Project- Jessica Pecoraro


I chose to do wine bottle label designs for my final project. I work in a restaurant and wine knowledge for me is a must, so I was able to research labels at work, and do a lot online. I found the designs that caught my eye the most were the simple ones. So, thats what I decided to do. I decided to go for a theme with the three different Z's. Zeal, Zest, and Zing... Which are all three words that could very well describe a wine. As far as the actual illustration, I illustrated the wine bottle myself, which took the most time. I chose an image from google and then used the pen tool, gradient tool, and mesh tool to help me with making it look more realistic. Then copied it three times. I then designed the labels and placed them on the bottles. Overall I feel I did a pretty decent job and feel that I have come a long way since the beginning of the quarter.


Adam Bentley : Final Digital Illustration


I play disc golf alot so it was only natural for me to design my own discs. I was trying to go for a little grunge look but also just wanted to do my own thing. I tried to keep most of the design symetrical since it is on a round object. I used live trace for some of the pictures like the skull and Bob Marley and the trees behind him. I also used the pen tool to draw out some things like the little tear drop looking things on the blue disc. I was going to add a face to the green one to make it fit in more because it does seem a little out of place but I couldn't figure out which face to put on there. All in all I'm happy with the outcome of the product and I'm currently trying to find a place that can print these directly on my discs so I can truly start to make my own discs.


Product Illustration

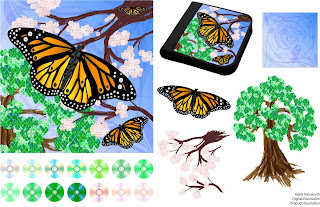
I've created a set of images to go onto the cover of CD/DVD books for storing discs. So I chose three natural images, and used discs for the circular elements in the images.

Butterfly: I had originally intended to create a bonsai tree for this image with cherry blossoms in the background, but the tiny bonsai tree just kept looking like an ordinary tree that was out of proportion. So I decided to focus the image on a butterfly, and used the bonsai tree as an ordinary tree in the background.

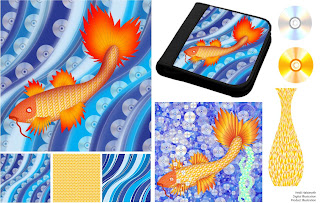
Koi: I had tried two versions of this koi, using the same koi outline I had created. But I almost entirely remade it. The gradient on the first one (lower center right) wasn't even, the scales, which were created from a flat pattern of overlaying orange tinted discs, looked flat, and the background wasn't impressing me. The "vase" image is what I placed in the background of the final koi body, warped so its appearance would be less flat, and I made the final gradients in Photoshop, which came out better.

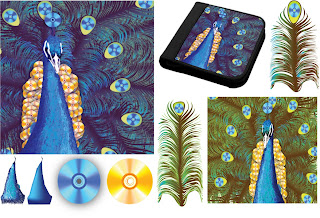
Peacock: I created the feathers first, which looked like spikes until I used the warp tool on it. I've included the base image of the body created with the mesh tool, and the texture that went overtop using a stylized brush (both in the lower lefthand corner). Once assembled, I found I wasn't very pleased with over abudance of the green and brown in the feathers (lower righthand corner) so I adjusted the levels in Photoshop for my final image.


Illustrated Instructions


I first created this kind of display (the one in the photograph in the lower right hand corner) trying to preserve dried flowers I'd had in a box for years. I came up with how to make it just finding random, unused stuff in my home. So I made the second one in the lefthand photo to figure out the right way for someone else to make this considering why they would want to make this kind of display. There is some use of the 3D toolin Illustrator, which was rather difficult to achieve the intended appearance.

Initials and Object


Initials: Since my initials are HH I got the idea to do a play on reflection, which is why each version has both initials mirroring each other with little difference. The first one has my initials in a set of scrolls, and the second is an exploration in geometry.
Object: This object is a dragonfly pin that I have. A great deal of the slight variations in color and reflections are just dots created with the paintbrush in Illustrator, and blurred in Photoshop to give it a smoother, more realistic appearance.


Simple Object

The images here are based from a photo of a wooden bird carving I inherited. I tried out three different views of this object, and I included the six thumbnails of this particular view in the upper right, and a black and white photograph of the actual photograph on the lower right.

Daniel Mascio Project 4 - Product Illustration - Digital Illustration student project - cc - not for commercial use


For my Product Design I did flower pots with Care Bear designs. I got the idea to design a piece more tailored to children from the Peanut Butter & Jelly technical illustration for the last project. From the finished piece you can see the Care Bears that were designed along with their mapping on a flower pot. The pieces look a little simplistic to me, however there was a lot of work that went into each piece to get everything looking right; more 3D on the characters with a lot of back and forth between Illustrator and Photoshop to work on individual parts of the whole.

Tuesday, September 22, 2009

Kari Single- Digital Illustration- Product Illustration

My product is for a line of indoor tanning lotions. I was initially inspired by the very creative designs by California Tan and mostly Designer Skin, which is the brand I chose. I'm not very happy with the way they turned out because they are very 2-dimensional and there is something missing. I feel like I could've pushed this project a little harder, but unfortunately I had some questions about Illustrator techniques that couldn't be answered. I would've like to have a little more direction and maybe another week in-class to work on this project to make it pop. I was very excited about this project, but also disappointed that our instructor had to leave before this project was complete. Hopefully I will find the time to re-visit this artwork and improve the look for a better portfolio piece.

Classmates: If any of you are really good with Illustrator and can offer me some suggestions/techniques to make my product design improve, please comment to this blog. I am open to suggestions. I would like to give the bottles a more realistic three dimensional look.
Thanks, Kari

Monday, September 21, 2009

Daniel Mascio Project 3 - Technical Illustration


For my Technical Illustration I did an exploaded view of a wall switch. I color coded the pieces of the wall switch to the colors for the piece descriptions to make the piece more visually conducive and remove the need for arrows to point out which piece correlates to which description.

Monday, September 14, 2009

Final Project

Students please post your final project here before the final class session. Make sure that you label the post "YOUR NAME - CLASS NAME student project - cc - not for commercial use".

I apologize but I will not be returning to class, but will grade your final projects.

Wednesday, September 9, 2009

P3-Baileigh Armes

With some inspiration from old PS1 fighting games (Tekken for example) I wanted to make my own command list for a fighting game. For the future, I'll change the font of the text to something more uniform. The dark gray will change into a lighter shade, almost white, there will be more moves, and there will be a controller added.

Informational Illustration

The weakest of all my projects. I sadly lost my flash-drive half way through the assignment and retraced my steps to this point. The pumpkin was all one color of orange and the steps were hard to follow since you couldn't quite see a difference in what the new attachments to the pumpkin were. So I shaded in the old bricks and that caused the new bricks to be placed stand out more and made it more visually easy to understand.

This is my informational illustration for the third project.
Still could use a little tweeks but overall I'm very happy with the final result.

Object and Initials

iPod Nano 3rd Gen.

Out of the four initials, the bottom right works the best with me and has become my digital signature on my works. I feel the others aren't my style, mainly the cursive looking one (Bottom Left).

The iPod was my choice because at the time, I was listening to it and figured it's a simple yet complex design and showed as much of it as possible in one view. I then divided it into hard edge shading areas and colored it accordingly. The last piece was a simple value study of the iPod then I placed a red overlay on top.

Image Sublimation Project

XBOX 360 controller

Outlined as best as possible
with the pen tool. Then filled
in using the live paint bucket
in three different formats. This
angle was chosen out of a
straight-on, over head, and right
side. Hardest part must have
been the 'A', 'B', 'X', 'Y' buttons.

Joshua Morales Project 3: Engine Explosion


"Engine Exploded" was a digital illustration I created based off of a six cylinder engine. It did not take that long create just tuning the minor details and displaying proper perspective. The original diagram this is based off of lacked a tremendous amount of detail that left one wondering about certain parts. My goal was to accurately display these parts to the reader in a simplistic manner that would not be to confusing. Color was left out but now after thought could be used to help.

Jessica Pecoraro - Technical Illustration


I chose to do "how to filet a fish" for my technical illustration. The example I found was very cluttered with too much detail, so I chose to make the illustration organized and simplified. I also added the parts of a fish, because if your like most people I would think you wouldn't know the exact fins and such. Also, I made sure the warnings and "what you will need" were very obvious.. because if your a first timer, it could be a dangerous job. :) I used tracing paper and copied basic shapes of the original and then scanned it in and used the pen tool.

Apple In-Class Project

Pretty straight forward.
It's an apple with shading
and highlighting. The word
"apple" was placed due to
boredom and works well
with the overall layout of
the image.

Adam Bentley: Technical Illustration

I did my illustration on how to build a shelter. The original illustration I based this off of only had to pictures to show how to build it and no text. I thought this was too simple and wanted to elaborate on the idea more. I used mainly the pen tool to draw out everything and I used the symbol sprayer tool to do the grass. I would have done something more with the text to improve it but I'm happy with the outcome of it.

Instructional illustration


I did my illustration on how to make a peanut butter and jelly sandwich. My demographic was elementary kids. I wanted everything to come out colorful and simple for them t easily understand all of the steps involved. I'm happy with how it turned out though I would change a few things.

Kari Single- PROJ 3 Technical Illustration


My technical illustration shows equipment needed to prepare for a freefall skydiving experience. It also gives you a little more knowledge and terms about the rig/parachute. After looking at the illustration, I would like to add a little more details and definition to a few of the canopy terms for better understanding. If you haven't tried skydiving, I would definitely recommend the experience!

Wednesday, September 2, 2009

Daniel Mascio Project 2 - Initials & Object


For my initials I created a scriptive type "d" and use a Garamond letter "m." I liked the dynamic between the two letters. I felt the letter "d" was more playful and energetic, while the letter "m" was more sturdy and stable. Giving an overall balance to the piece.

For my object I chose a coffee mug. I feel the piece came out really well. Dan had commented that I put too many light reflections on the handle of the mug - which I agree with. I had some difficulty with getting my initials to look "right" on the mug - I wanted them to look as if they were wrapping around the mug and I think part of the difficulty was due to the design of the initials themselves; the dynamic variation between the letterforms. I'm not completely happy with how it looks on the finished piece, but overall I like how the piece came out.

Daniel Mascio Project 1 - Image Sublimation


There is a ceramic mushroom in my living room that I see every day, so I chose to use it for the Image Sublimation project. I used different features of the mushroom to create the three different views shown to the left.